Digging in to soil health

This content draws on farmer knowledge and experience—as well as established science and research—to generate learning resources, decision making support tools, and practical ‘how to’ information.
This content was developed with oversight and reviews by the Quorum Sense Farmer Steering Group.
What is soil health?
“Healthy soils have functional water, carbon, decomposition and mineral cycles. These soils are vibrant and alive with full structural integrity, able to withstand heat, dry, floods and rebound quickly after disturbance.”
- Nicole Masters in ‘For the Love of Soil’ (pg. 28)
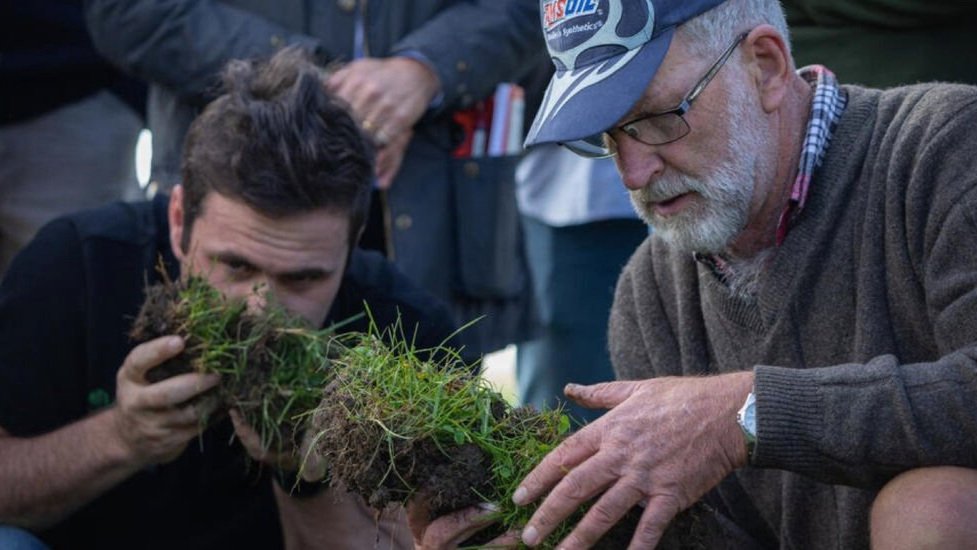
David Birkett (from ‘Building arable soil health’ case study)
Soils with good aggregation and porosity:
able to ‘breathe’ and infiltrate water, plus retain and cycle nutrients
less at risk of erosion and runoff
encourage extensive root growth and microbial activity,
resilient to dry and wet climate extremes
less reliant on inputs and are therefore more productive
“"We see low total porosity when you have very low organic matter in those soils…the connectivity between those pores is very low as well.”
- Professor Andy Neal, Rothamstead Research, UK
Andy Neal (from ‘A microbiologist’s perspective with Andy Neal - Webinar Mar'23’)
Soils with healthy biology:
essential for resilient, low input, nutrient dense farm systems
contain a diversity of algae, viruses, bacteria, fungi and protozoa
contain active nematodes, earthworms and insects
“So organisms living in these soils with two different amounts of organic matter inputs are experiencing very different environments, very different challenges to accessing nutrients, water and oxygen, particularly.”
- Professor Andy Neal, Rothamstead Research, UK
Peter Legg (from The Quorum Sense Podcast #29)
Andy Neal (from ‘A microbiologist’s perspective with Andy Neal - Webinar Mar'23’)
Soil nutrient levels:
context specific, depending on soil type, plant species, microbial activity
must be adequate and balanced to support healthy plant growth
must not be in excess (excesses of some minerals can reduce availability of others)
“I think there's still a place for fertilisers going forward, but we've just got to be much more efficient with it. They've been too cheap and everyone's just been sort of gluttonous with it, just throwing it out, and it's been causing problems."
- Tim Rutherford, beef / sheep farmers, Otago
Tim Rutherford (from ‘How the Rutherford's healthy soils are restoring the water cycle in Central Otago’ case study)
How to assess soil health - part 1
“Establishing a soil health baseline and monitoring programme is a powerful way to drive soil health improvements. What gets monitored gets managed!”
- QS Toolbox in ‘How to assess soil health’
David Birkett (from the ‘Building arable soil health’ case study)
VSA was developed by Graham Shepherd (NZ).
Identifies and compares key soil health and plant performance indicators
Use representative sample sites across your farm
Guides and printed copies available at gshepherd@BioAgriNomics.com
‘Soilmentor’ app helps explain VSA, record results and present the data
“FAR has developed an simpler mini-VSA focused on three key indicators for cropping soils.”
- QS Toolbox in ‘How to assess soil health’
A simple visual judgement of soil conditions by digging holes.
How easy / hard was it to get the spade into the soil?
How well aggregated is the soil?
Is there a difference in colour?
Are there more or less worms or insect pests?
Does it smell ‘earthy’ or sour / acidic?
Are soils thatchy?
“And looking on top of the soil, are your animal dung, plant litter or crop stubble breaking down quickly or slowly?”
- QS Toolbox in ‘How to assess soil health’
David Birkett (from the ‘Building arable soil health’ case study)
The most farmer-friendly option is to simply spend time observing your farm, pastures and crops:
What’s flying around?
What’s on the plants?
What’s on the soil surface?
What’s in the soil?
But you can also get specific:
What’s the % of grasses, legumes and forbs present?
How many different species are in each category?
How many earthworms are present?
“Arable farmers might choose to assess diversity across their whole farm / rotation, rather than in an individual paddock.”
- QS Toolbox in ‘How to assess soil health’
David Birkett (from the ‘Building arable soil health’ case study)
Common soil testing options include:
Macronutrients, micronutrients and other minerals
Cation exchange capacity (CEC) and anion storage capacity (ASC)
Base saturation and pH
Calcium-magnesium balance
Organic matter and soil carbon
Soil Food Web tests for fungi, bacteria, protozoa, nematodes, etc
‘Plant available’ versus ‘total’ soil nutrients
“Consider comparing soil and herbage tests taken in the same time and place – does herbage nutrients analysis reflects available soil nutrients?”
- QS Toolbox in ‘How to assess soil health’
Nicole Masters (from The Quorum Sense Podcast #5)
Peter Legg (from The Quorum Sense Podcast #29)
How to assess soil health - part 2
“Once we have organic matter sequestered…but we then deconstruct that soil structure by ploughing, effectively it breaks open all those structures that are hiding organic matter from microbial respiration, and it all becomes exposed again, and a lot of the organic matter…is mineralized and lost as carbon dioxide from the soil.”
- Professor Andy Neal, Rothamstead Research, UK
Andy Neal (from ‘A microbiologist’s perspective with Andy Neal - Webinar Mar'23’)
Why use a penetrometer:
measures the amount of resistance through the soil profile
indicates the depth and ease in which plants roots can grow
How to use a penetrometer:
Push the penetrometer into the soil at a steady rate watching the pressure guage.
Record the depth at which resistance rises above 300psi - this is the top of the compacted zone.
Record the depth at which resistance falls below 300 psi - this is the bottom of the compacted zone.
Note: If resistance never increases above 300 psi there is no severe root-limiting compaction; if resistance remains above 300 psi there is no bottom to the compaction zone.
Nicole Masters (from The Quorum Sense Podcast #5)
“Roots may still penetrate soil with a penetration resistance greater than 300 psi if natural cracks and pores are present.”
- QS Toolbox in ‘How to assess soil health’
Nicole Masters (from The Quorum Sense Podcast #5)
A water infiltration test measures how fast water can infiltrate into the soil. It’s a good indication of the level of porosity, compaction, and aggregation.
What you’ll need:
A ring cut from drainage pipe (100mm diameter pipe works well, but any size will work) approx. 150mm long, marked all round with a line 100mm from one end
Measuring tape or ruler
Hammer or small mallet
Knife (if the ground is hard)
Block of wood wider than the ring
Plastic wrap to line the ring when adding water
Timer
Notebook for the results
“Before starting, clear the ground of vegetation so that the ring can sit on bare soil.”
- QS Toolbox in ‘How to assess soil health’
Steps:
1. Drive the ring into the ground to the 100mm mark (use the knife to cut a slit in the soil for the ring if dry or hard) disturbing the soil as little as possible.
2. Line the inside of the ring (covering the soil surface) with a sheet of plastic wrap.
3. Insert a ruler and add 25mm (1inch) water.
4. Slowly pull the plastic wrap away and start the timer and record the time taken for the water to soak in.


Keeping the ring in place, repeat steps 2–4 a further two times and average the results.
Information from www.integritysoils.co.nz/blogs/resources-lists/how-to-do-a-infiltration-test
Brix is a measure of the dissolved solids and sugars produced during photosynthesis. It helps indicate whether plants are efficiently converting sunlight into energy or not.
High brix (>12) indicates:
more energy for growth
more energy to feed soil microbes via plant root exudates
more resistant to pest and disease pressure
Lower brix indicates:
under stress
dehydrated
less healthy and more prone to disease / pest attack
at risk of being outcompeted by weeds
Brix levels vary:
during the day (allow at least two hours of sunshine before testing)
reduced by cloud cover
lower after plant has set flower / seed
rise after fertiliser / nutrient application (rate of fall after application can indicate how effective the application was)
with method of extracting sap - always use the same method

Steps:
Open the daylight plate, wipe the refraction prism carefully with soft flannelette.
Select the first fully developed leaves, twist a few times and then place in a garlic crusher to squeeze out the sap.
Put 2-3 drops of sap on the prism surface and close the daylight plate slowly to allow the solution cover the whole prism surface, minimising any air bubbles.
Turn the refractometer towards a light source and adjust the focus until the graduated lines can be seen clearly. Note the reading at the demarcation between bright and dark.
The blurrier the line, the better - a sharp between bright and dark can indicate free nitrates (especially if below 3 brix).
Information from www.integritysoils.co.nz/blogs/resources-lists/how-to-use-a-refractometer
“Measure your weeds! Your weeds should have a lower brix level, if not you need to look at why your current system is favouring weed production.”
- QS Toolbox in ‘How to assess soil health’
A slake test demonstrates the erosion potential of your soil during rainfall events and is a great indicator of whether your soil microbes are functioning or not.
What you’ll need:
clear glass or plastic containers
mesh supports (eg. made from hardware cloth) that will fit into the top of the container and hold the soil in the top half of the container
samples of soil collected from areas with different management
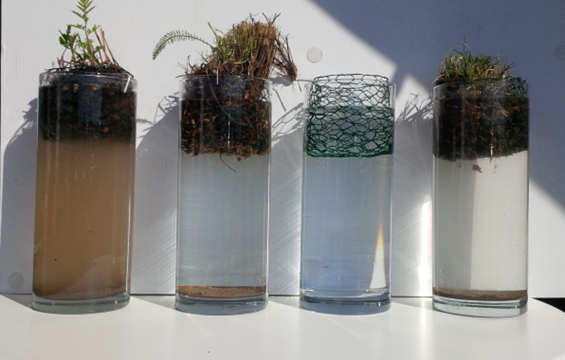
Steps:
Insert the wire meshes into each jar and fill the jars with water to a depth that will submerge the soil samples.
Simultaneously place each soil aggregate sample into the separate jars.
Watch to see which soil holds together and which one falls apart.
Aggregates from soil with poor structure will break apart in water.
Nicole Masters of Integrity Soils carrying out a slake test
“When a chunk of topsoil is placed into water, the water is drawn into the soil and displaces air. If the large pores within the soil are stable, water can move into the soil without causing the aggregate to break apart (“slake”). ”
- QS Toolbox in ‘How to assess soil health’
How to improve soil health?
"It all comes down to management and changing your whole outlook on how you manage your farm. Working with nature and noticing things that I would have not picked up in the past. Trying to read the landscape and what's happening."
- Tim Rutherford , sheep / beef farmer, Otago
Tim Rutherford (from ‘How the Rutherford's healthy soils are restoring the water cycle in Central Otago’ case study)
Improve the flow of air and water through soils for better soil health, productivity and resilience.
Growing plants feed soil microbes so driving aggregate formation
A variety of root systems means activity at different levels in the soil
Animal hoof action can break up soil crusts
Pasture residues or litter supports water infiltration
Mechanical aeration can break through surface crusts or subsoil pans
Some biostimulants can break down surface crusts
Tim Rutherford (from ‘How the Rutherford's healthy soils are restoring the water cycle in Central Otago’ case study)
“Mechanical and chemical soil disturbance can negatively impact certain soil microbe groups - especially fungi - who are essential to maintaining and improving soil health.”
- QS Toolbox in ‘How to assess soil health’
Root exudates are the primary food source for soil microbes, followed by decaying plant roots and litter.
Diversity plant populations capture more sunlight and support more diverse / balanced soil microbe communities
Boost photosynthesis and root exudate production by:
Increasing time green plants are present in soils
Minimising bare soil
Improving health and brix of plants
Ensuring full pasture recovery between grazing
Trample excess pasture to cover the soil and feed soil microbes
Support soil activity with biostimulants and microbial foods
“Maximising the flow of root exudates to soil microbes will feed and drive soil microbial processes including nutrient cycling and aggregation.”
- QS Toolbox in ‘How to assess soil health’
Peter Legg (from The Quorum Sense Podcast #29)
Peter Legg (from The Quorum Sense Podcast #29)
In healthy soils, plants and microbes work together to unlock and cycle nutrients/minerals bound in the soil profile.
This can reduce or eliminate reliance on fertiliser inputs to maintain / improve production.
Is the problem nutrient- or management-related (eg compaction)?
Use ‘safe-to-fail’ trials to test the impact of reducing fertiliser inputs
Know that some fertilisers are more ‘microbe friendly’ than others
Foliar application can be a more efficient way to apply fertilisers
Consider using biological chelators (eg fulvic acid, fish hydrolysate)
“Remember that soil nutrient relationships are complex - an excess can sometimes be more limiting than a deficiency.”
- QS Toolbox in ‘How to assess soil health’
Mike Saunders (from the ‘Holistic grazing sheep in vineyards’ case study)